House Framing Explained: What Happens During This Stage
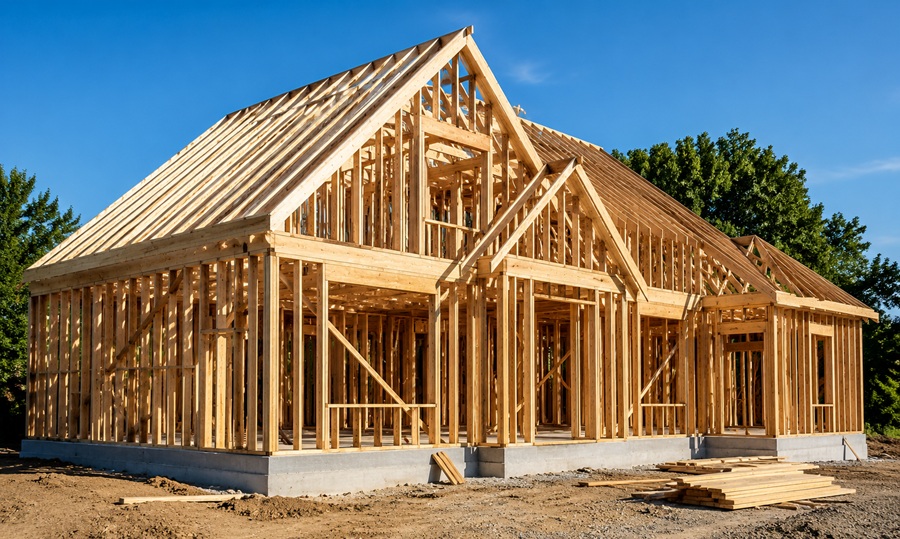
House framing is the stage where the wood or steel skeleton of a home goes up, including floor joists, wall studs, and roof trusses, following the foundation and before roofing, windows, and interior systems are installed. For a typical single-family home, framing takes two to four weeks and gives the first real sense of the home’s layout and scale.
To show what this stage actually looks like in practice, here’s how framing typically unfolds on a standard new-construction home, along with the lessons that tend to come out of it.
For homeowners watching a build in progress, framing is often the most exciting stage to witness, since it’s the first point where the project stops looking like a construction site and starts looking like an actual house, with real room dimensions and sightlines visible for the first time.
A Typical Framing Walkthrough
On a standard slab or crawlspace foundation, framing crews start with the floor system (if applicable), then move to exterior wall framing, followed by interior partition walls. Once walls are up and braced, roof trusses or rafters are set, followed by roof sheathing to make the structure weathertight as quickly as possible.
On one typical mid-size home build, the crew framed exterior walls on day one and two, interior walls on day three, and completed roof trusses and sheathing by the end of week two — a fairly standard pace for a home in the 2,000 to 2,500 square foot range without unusual structural complexity.
What Happens During the Framing Stage?
Floor framing (for homes with a crawlspace or basement) involves installing floor joists and subflooring across the foundation. Wall framing follows, using vertical studs spaced according to code (typically 16 inches on center) with headers over window and door openings to carry structural load. Roof framing comes next, either using pre-engineered trusses or traditional rafter framing, followed by sheathing to close in the structure.
Throughout this stage, the local building department typically conducts a framing inspection before insulation and drywall can be installed, checking that structural elements meet code requirements.
Sheathing choice also matters at this stage. Oriented strand board (OSB) is the most common and cost-effective wall and roof sheathing material, while plywood is sometimes preferred in high-wind or high-moisture regions for its slightly better structural and moisture performance. Either material is typically wrapped with a weather-resistant barrier before roofing and siding go on.
How Long Does House Framing Take?
For a standard single-family home, framing typically takes two to four weeks, depending on size, complexity, and weather conditions. Homes with complex rooflines, multiple stories, or unusual architectural features can take longer, sometimes five to six weeks.
What to Inspect Before Drywall Goes Up
Before walls are closed in, check that framing is plumb and square, especially around window and door openings, since issues here become far more expensive to fix once drywall is installed. Confirm that rough plumbing, electrical, and HVAC have been installed correctly and pass their own inspections before the framing inspection is finalized.
This is also the point to double-check that any planned fixtures — like a mounted TV, grab bars in a bathroom, or heavy shelving — have blocking installed in the wall framing at the correct height, since retrofitting blocking after drywall is far more disruptive.
Common Framing Issues to Watch For
Out-of-square wall corners are one of the most common issues, which can cause problems later with cabinet installation, flooring, or trim work that assumes square corners. Missing or incorrectly sized headers over window and door openings is a structural issue that inspectors specifically check for, since undersized headers can lead to sagging over time.
On one build, a framing crew installed a bathroom wall without blocking for a future grab bar, which wasn’t caught until the homeowner requested it during the finishing stage — requiring the wall to be partially reopened rather than a simple installation.
Lessons Learned and Recommendations
Walk the framed structure in person before drywall goes up, even if you’re working with a trusted builder. This is the easiest stage to visually confirm room sizes, window placement, and ceiling height match what you expected from the plans — changes are still relatively simple to make at this point.
Flag any future fixture or furniture plans — mounted TVs, grab bars, heavy shelving, curtain rods in unusual locations — to your builder before framing is closed in, since adding blocking at this stage costs little compared to retrofitting it later.
Don’t skip the framing inspection walkthrough with your builder, even if the municipal inspection has already passed. A municipal inspector checks for code compliance, not necessarily whether the layout matches your expectations or plans.
Take photos of the framed structure, particularly of wall interiors before insulation and drywall cover them. These photos are useful reference points years later for any renovation project, letting you know where studs, wiring, and plumbing run without needing to open up finished walls to check.
Frequently Asked Questions
What materials are used for house framing?
Most homes in the U.S. use wood framing (dimensional lumber like 2x4s and 2x6s), though steel framing is used in some regions and commercial-adjacent residential construction for added durability and pest resistance.
Can framing mistakes be fixed after drywall is installed?
Yes, but it’s significantly more expensive and disruptive, often requiring drywall removal to access and correct the framing issue.
Does framing include the roof?
Yes, roof framing — trusses or rafters — is part of the overall framing stage and is typically completed before the structure moves to roofing and exterior sheathing work.